
Memes
HOWTO: PS2 Emulation via PCSX2


PCSX2 So, I heard you guys like PS2 games. And you'd love to play more of them, easily, in a better, faster, more beautiful way than on the old broken PS2 you have there in the corner. Thankfully, emulation is here to cover all your needs and I'm here to tell you everything you need to know to get your own PCSX2 emu up and running. Now, some of you may be wondering, why the **** would I want to bother with emulation when I have perfectly fine working PS2. There's several reasons, let me start with the biggest one.
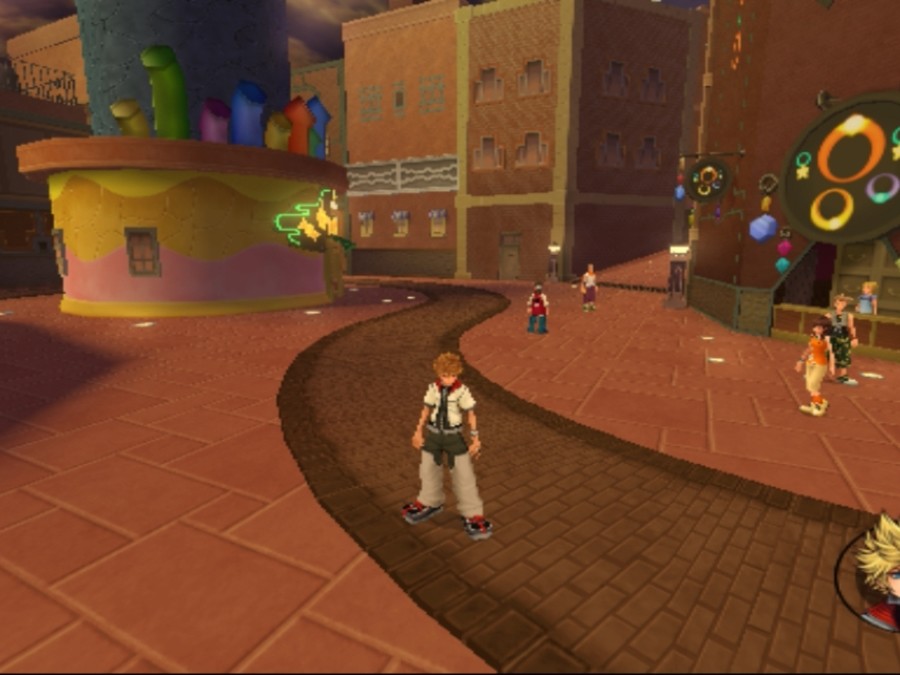
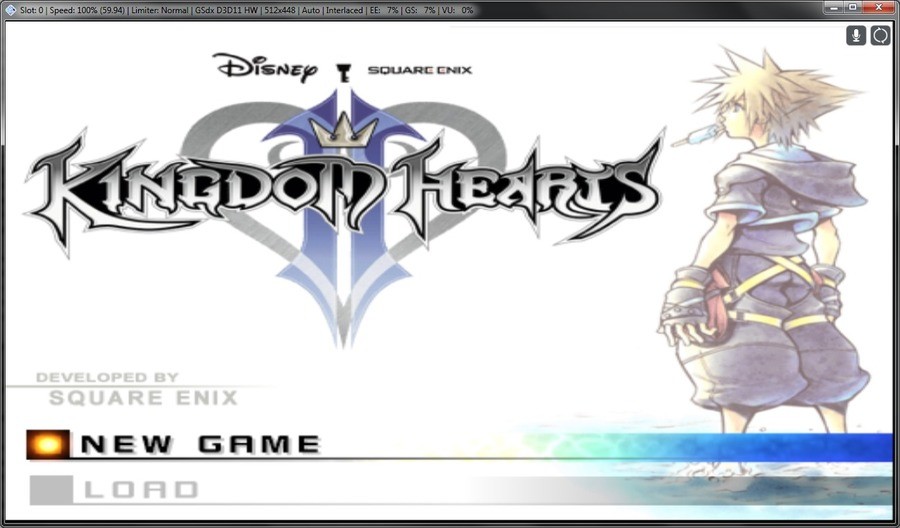
Emulation allows you easily to go from this ugly piece of ****... Ignore the cut-off UI in the corner, I just cropped a 16:9 screenshot to make my point, since PS2 originally is 4:3
...to this gorgeous ************ in a few simple steps. But wait, there's more! as one famous salesman would say, may his soul rest in peace. With emulation, you'll also be able to get the following advantages: - Higher resolution (as already demonstrated) - Widescreen support (as already demonstrated) - Smoother framerates - Use any controller you want - Save states - Cheats (if you're into that kind of thing) - Advanced features like custom shaders, allowing you to "toonify" your game for example (I won't be going into that in this guide though)
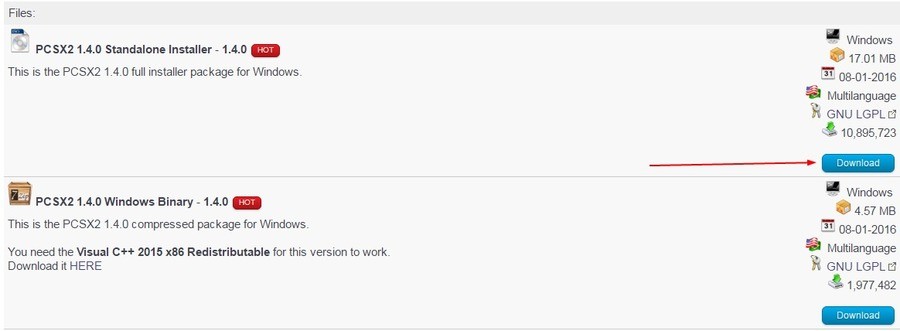
Download & Installation First things first, we'll want to go and download the actual thing. We'll want the standalone installer, not the binary package. If you're not on windows, locate the download for your platform of choice, I hope I don't need to hold your hand through that. http://pcsx2.net/download/releases/windows/category/40-windows.html
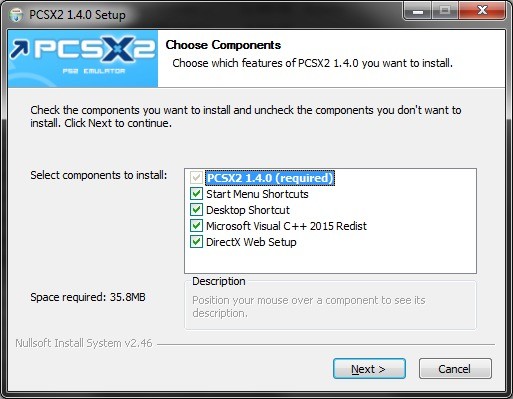
Installation is straightforward, just leave it all at default. Optionally, change the installation path, it doesn't really matter.
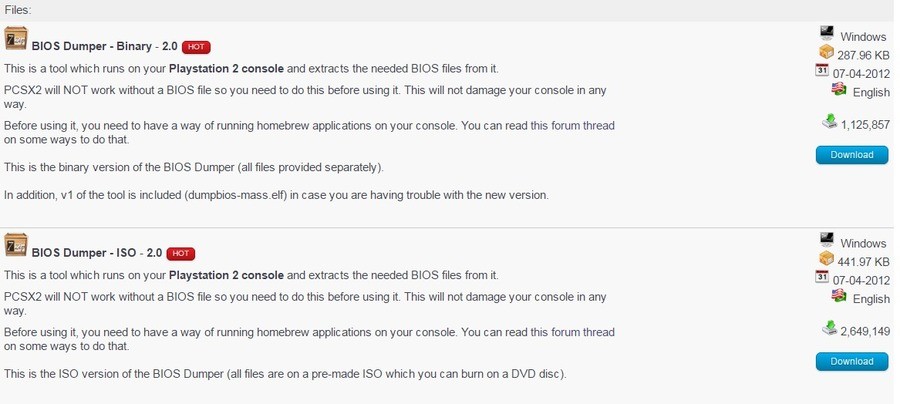
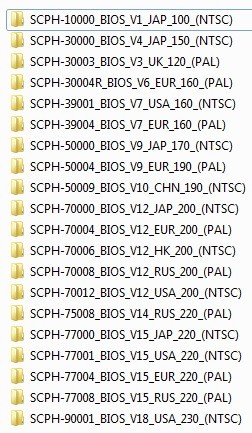
PS2 Bios Next, let's talk about the bios for a bit. The bios is essentially the operating system of the PS2 and it is required for the emulator to work properly. Where does one get such a bios, you ask? it's simple. You use the BIOS ripper tools to rip it from your PS2. You have to have a PS2 capable of running homebrews to do so. See the link below. http://pcsx2.net/download/releases/tools/category/9-tools.html I will be posting a collection of bios files in sticky in the comments so you can see how such bios files look. I trust none of you would illegally download and use them instead of ripping their own bios from their own PS2.
This is how the folder with various bios files looks. After ripping, your bios files should be in a similar folder.
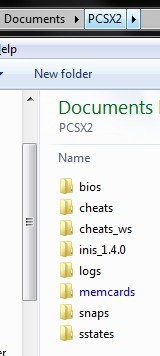
Next, you'll want to copy the contents of your chosen ripped bios folder into the bios folder of PCSX2 located in Documents/PCSX2
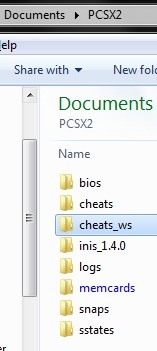
Widescreen support Now, let's quickly take care of widescreen support. Every game needs its unique patch to be widescreen but most games have one created for it. For your convenience, I've packaged all the available widescreen patches into a file. Simple unpack the contents of the file into the cheats_ws folder. As simple as that. You need to login to view this link
Initial Setup & Configuration NOTE: Virtually everything, every little checkbox and selection in PCSX2 has a rich tooltip if you hover your mouse over it. It explains things quite nicely so use it if you'r ever not sure. Upon first launching PCSX2, you'll have to go through a bit of initial setup. Language selection is self-explanatory I believe.
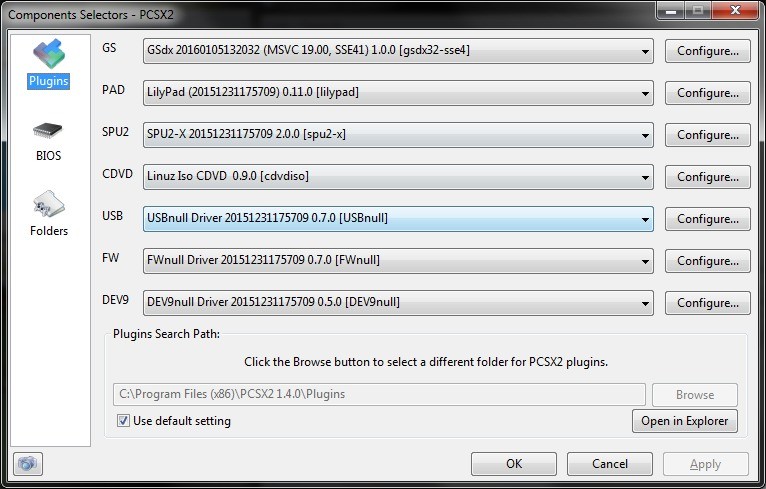
Next, you'll have the plugin selection screen (the initial setup one looks a bit different but same thing). This is where most of the magic happens so pay attention.
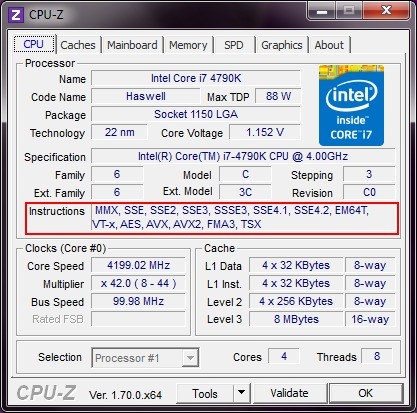
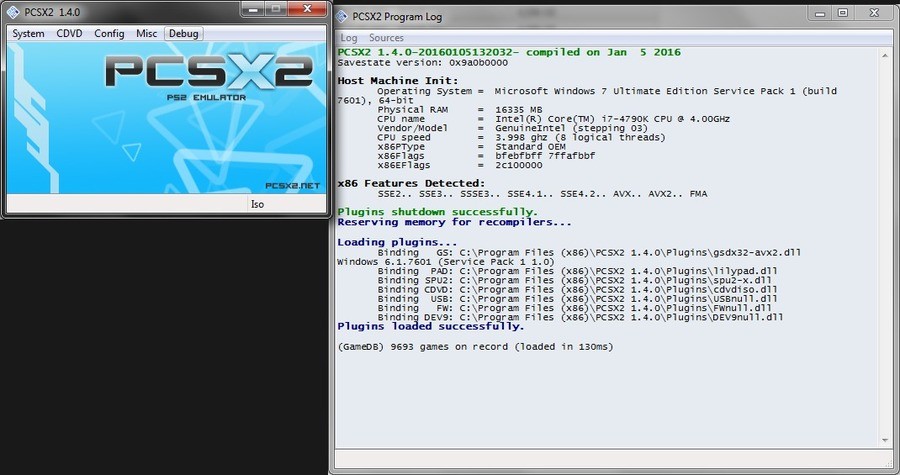
First thing you'll want to do is to find out what technologies your CPU supports. I use a nifty utility called CPU-Z but you can just google your CPU name and PCSX2 even tells you the technologies in the log once it's running properly.
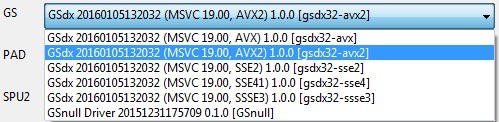
The technologies your CPU supports are important when choosing the correct graphics plugin. This can have a huge impact on performance. You'll want to select the highest possible technology your CPU supports. The order is as follows. Hardware mode: SSE4 > SSE3 > SSE2 Software mode: AVX2 > AVX We'll talk about hardware and software modes shortly.
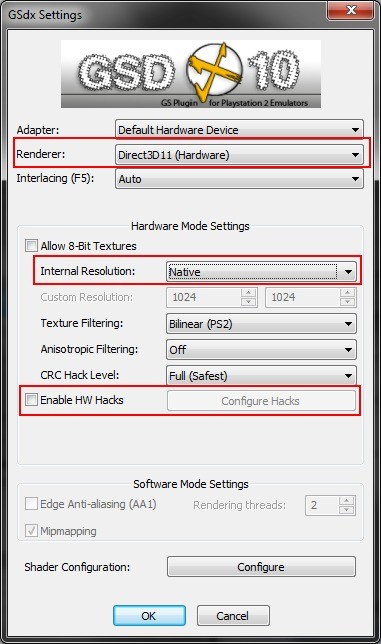
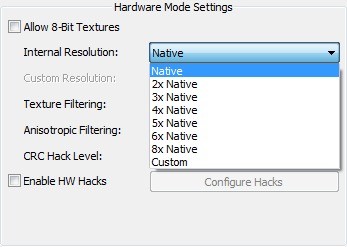
Once we've selected the correct plugin, we click on the configure button next to it. Now, this screen looks scary but it's actually fairly simple. I've highlighted the most important parts. Let me break it down from the top. Adapter: Your GPU. You'll want this left alone in 99% of the cases. Renderer: This is the most important. Basically, you'll want to choose the highest directX version your GPU supports, which should be DX11 for virtually all of you by this year, in hardware mode. In some rare cases, game compatibility will force your to use OpenGL mode or even software mode. More about game compatibility later. If you're running in hardware mode, PCSX2 is using your GPU to do all the heavy lifting. It's the key to good framerates. Software mode causes your CPU to compute EVERYTHING, which is, as you can imagine, very intensive. Nevertheless, some games may force you to use software mode, in which case make sure to switch to the appropriate plugin (see above) to get more performance. Interlacing: This is best left at auto, PCSX2 is smart enough to handle it. Allow 8-bit textures: This is best left alone, unless your CPU is far weaker than your GPU, in which case turn it on. Internal Resolution: This is where you'll get most of your graphical fidelity. I recommend at least 2-4x internal resolution. The more the better, as long as your PC can handle it. Note that in extreme cases, you can use the custom box to lower the resolution actually lower than native PS2 resolution, but I wouldn't recommend that, it looks horrible. Texture filtering: Best left alone, negligible impact on performance. Anisotropic filtering: Somewhat demanding option but if you can raise it, do so as much as you can. Improves the looks of textures when viewed at extreme angles. CRC Hack Level: Best left alone. There are a few cases where you may want to change it, see the tooltip for more info. Hardware hacks: You will only need to enable these if they're pointed out specifically for compatibility with a certain game. In most cases, you do not need to bother.
Here is the window of the hardware hacks. From the tooltip, we can see that for example the "align sprite" hack fixes some issues in Ace Combat. However, it is best to use the wiki for compatibility options and not blindly mess with the hacks. More on the wiki later.
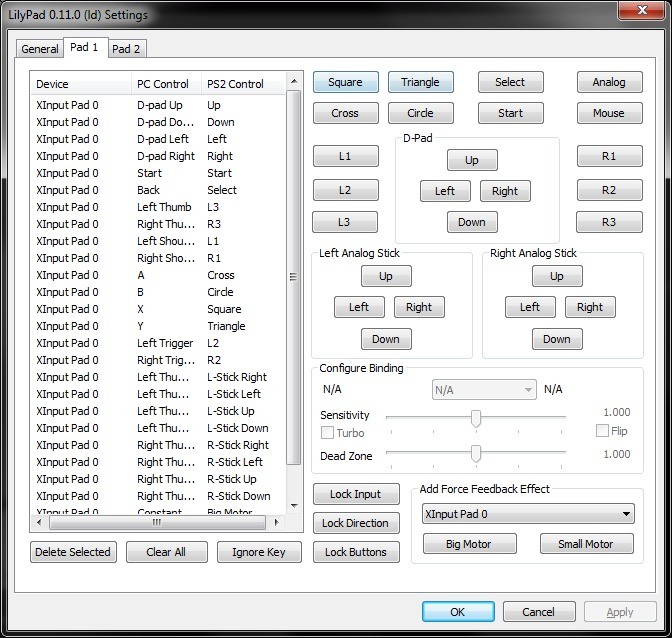
Next up is the controller setup. Leave the default plugin in and just simply select configure. You can bind mouse and keyboard to various functions via the first tab but I'd recommend against that. It's best if you have a controller Note: You can download a driver for PS3/PS4 controller so you can use it with Windows/PCSX2 here: http://pcsx2.net/download/category/37-misc.html Configuration is simple. Just click on the button in the config screen and press the button on your controller you want to assign to it. Chances are, the configuration will have been automapped for you already. Careful! It is possible to assign multiple buttons to one PS2 button so check the mappings screen on the left that you don't have double mappings.
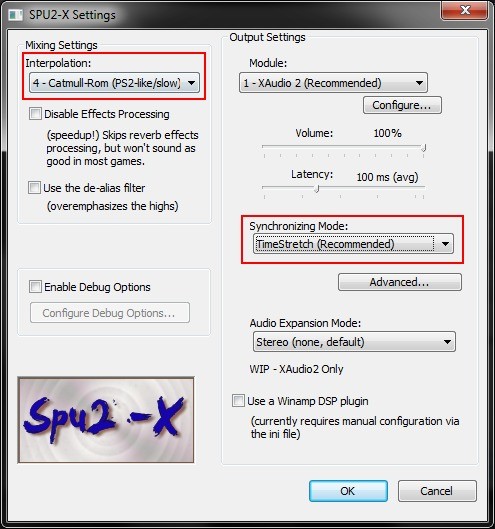
The final bit of any real configuration is the Audio plugin. Again, leave the default one and open the config window. Here, you'll mainly be interested in the two highlighted options. Sound processing is actually one of the more intensive parts of the emulation and if your PC is not strong enough, it's possible it's the sound itself that's bringing you down. In case of poor performance, try to lower the interpolation level and see if it has an effect. You can also try to disable effects processing.
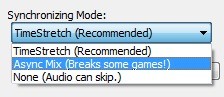
If all else fails, you can try changing the synchronization mode from TimeStretch to Async Mix. This will provide great speedup but at a certain cost. TimeStretch will force the game and audio to sync up, even at the cost of framerate. Async Mix will not force the game to wait for the sound, so if the sound gets too complex and would cause a slowdown, it goes out of sync instead without slowing the game down, until it catches back up. It is up to you to test it and see if it's acceptable in your game if you cannot get TimeStretch to work without slowdowns.
Lastly is CDVD plugin. Leave it on default if you plan to use your original PS2 game, putting it in your CD/DVD drive or select the Iso plugin if you plan on using an ISO image. You can always switch the plugins later in configuration, so don't worry, you can do both.
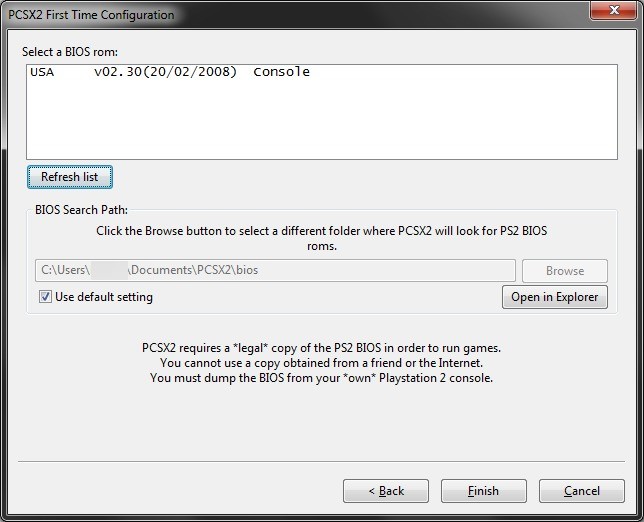
Last screen of the initial setup will be the bios selection screen. Here, you should see the bios that you've copied in the previous step. If you don't see any, check that the path below is correct. Select the bios file and click Finish.
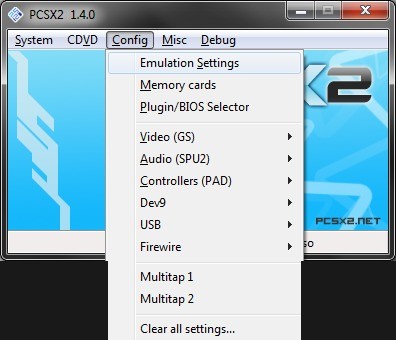
Final Configuration steps Now you're ready to play your games but first, let's take a little while to change a few small settings that nevertheless may have strong impact. As you can see in the console, your CPU technologies are listed there so if you weren't sure before, you can change the plugin to the correct one now via Config -> Plugin/BIOS Selector
Speaking of config, let us visit the emulation settings for a bit.
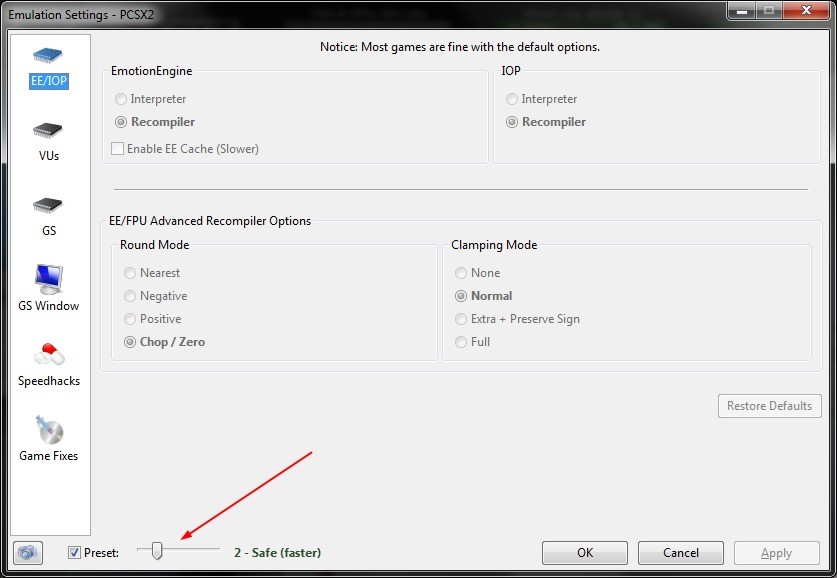
First thing you'll notice is, you can't change anything! That's actually because PCSX2 has a couple of handy presets that will take care of all the configuration for you. The default preset should be fine, if you need more performance, slide it a bit to the right. The tooltip has more info.
We'll skip the first 3 tabs but let's stop at the 4th one for a bit. Here, it's very important to change the aspect ratio to 16:9, otherwise our widescreen patches won't work correctly. If you find that a game does not have a widescreen patch, you'll want to change this back to 4:3 while you play it. The rest of the settings are self-explanatory. Note: The window size is NOT your game resolution. It is merely for you to manipulate with the window comfortably. You'll likely want to be playing on fullscreen mode most of the time anyways, which you can get to by pressing Alt+Enter or double clicking the window while the game is running.
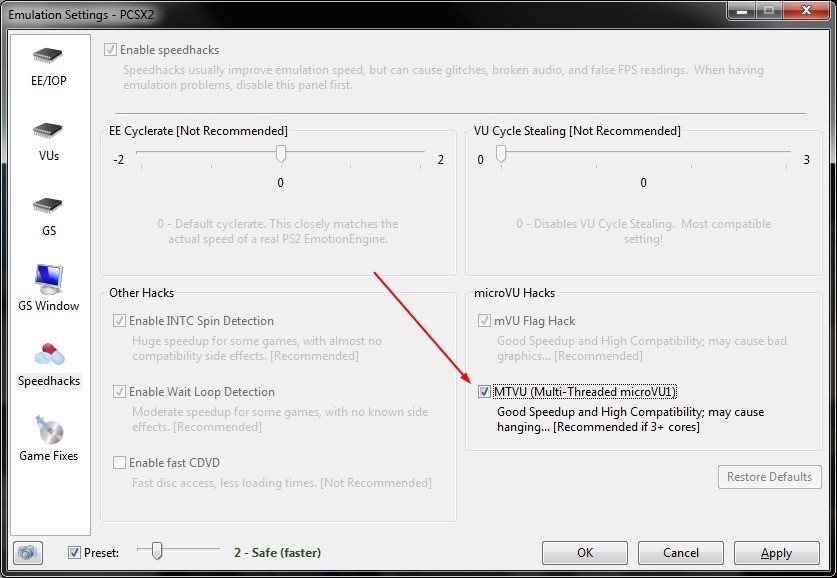
The last thing we'll look at here is the MTVU option on next tab. Long story short, if your CPU has more then 3 cores, enable it. If you experience hangups even with 3+ cores, disable it.
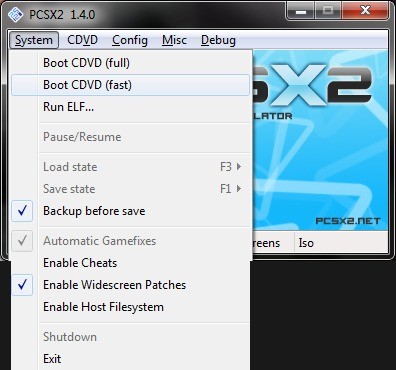
Now we're ready to launch our games. Open the system menu and make sure that the widescreen patches option is checked. Then, choose either full or fast bootup. If you are using a CD/DVD, it will boot up right away. If using ISO, it will prompt for ISO location. Full boot: This will boot the system from start, with the splashs screen and all, the same way as in PS2. Use this if the fast start doesn't work for you. Fast boot: This will boot directly into the game, a much faster and comfortable option. Use this unless it's giving you problems.
And just like that, we are in-game. As you can see in the top bar, we are at 100% speed, but that doesn't mean much when we're in the main menu. More about this later.
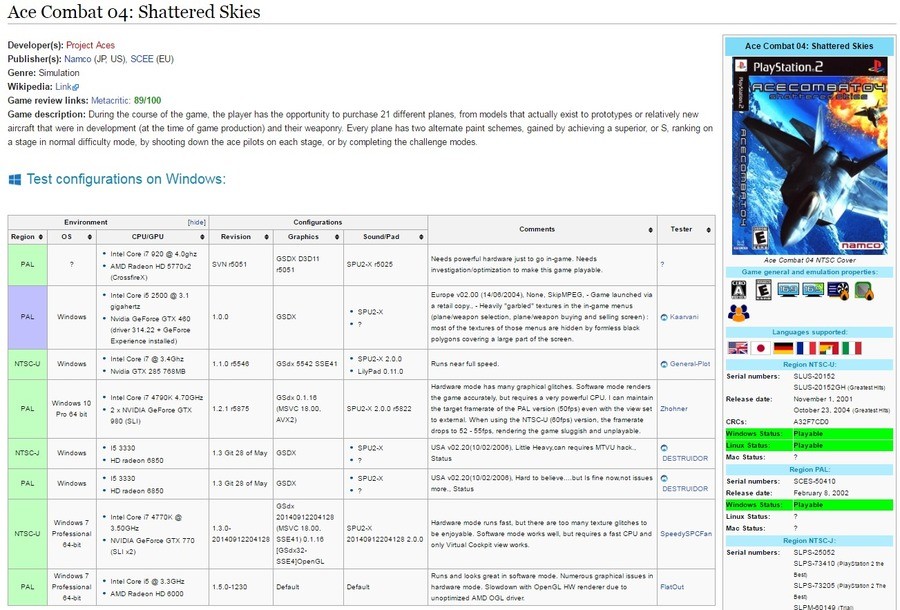
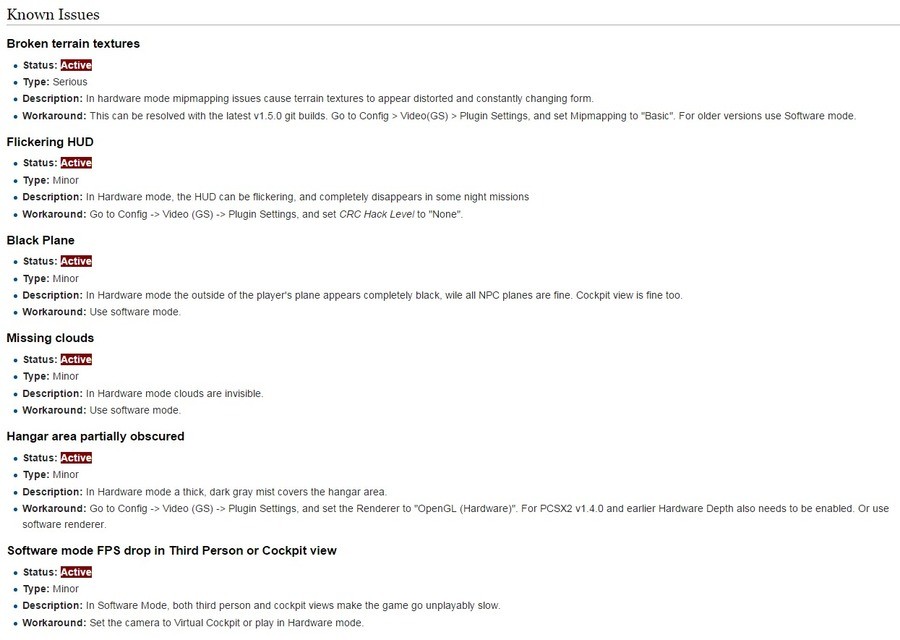
Troubleshooting Sometimes, a game might not work for you properly even if your machine is strong enough. It may simply not boot or bug out or just run slow. What to do then? Thankfully, there is a compatibility list handily available. http://pcsx2.net/compatibility-list.html First step is filtering the compatibility list by letter using the alphabet in the top left corner. Then we find our desired game and click on it. This will expand the entry, allowing us to click the wiki link. On the wiki, we can find description of the game, how playable it is and testimonials from users who tested it and what settings they used. However, the most useful section is the one below.
I believe this screen is self-explanatory.
Game ISOs Remember, you should only be using ISOs for games you legally own, ideally rip your own ISOs. In case you don't want to go through the ripping process however, you can download ISOs easily from the link below. This site can exist for the same reason that emulators and ROMs can exist, so it is safe to download from it. Certainly far safer than from a torrent. Not that anybody would actually pirate a game they don't own, of course. That would be illegal. http://www.emuparadise.me/Sony Playstation 2_ISOs/41
Final result and savestates Last thing I'd like to touch upon are the savestates and how internal resolution affects the fidelity of the game greatly.
If you can recall, I left the internal resolution at native. That leaves us with, well, the native PS2 resolution which is abysmal to say the least. Let us fix that!
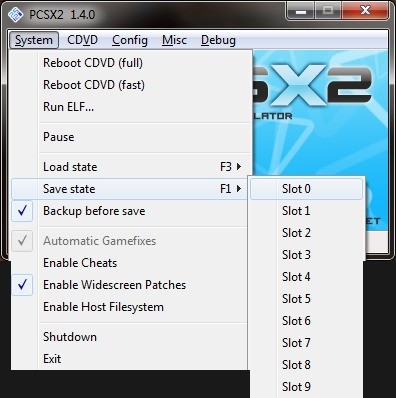
If we want to change some settings, we should first make a save state. We can do that using the system menu or simply pressing the F1 hotkey, simple when we're in fullscreen. Note that the hotkey always saves to the last used slot. What is a save state? Save state is basically the exact state of the emulation at the time of the save. What this means for you is you can make a save whenever you want and when you load the state, everything will be exactly 1:1 as you left it, down to the last byte. Very useful for quickly changing and testing various settings without having to rely on in-game save system and traveling to the desired location. Or you can savescum if you so desire.
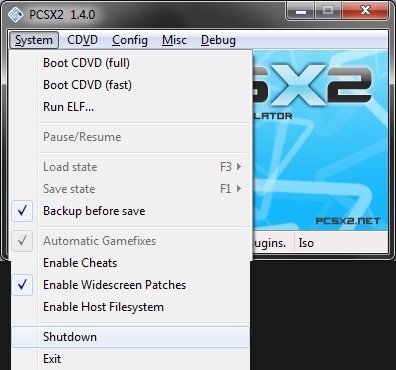
After saving our state, we shutdown the emulation and do our desired changes before booting back up. As soon as we see the main menu of the game appear, we can simply press F3 to load our save state and hop right back into action.
Let me demonstrate how simple resolution change can greatly improve the fidelity.
3x Native resolution
8x Native resolution + 16x Anisotropic Filtering Note that the UI in bottom right corner doesn't scale because it is not rendered. Sadly, there is nothing we can really do about this. Final Note One last thing I'd like to address is something some of you are surely wondering. Should I get the NTSC or the PAL version of a game? Let us compare. NTSC: Runs at 59FPS, providing smoother experience but requires more power to run at full speed. Furthermore, some games (like Ico or Shadow of the Colossus) have differences from the PAL version, so do the necessary Google research. These games are available only in English. PAL: These run at 50FPS, meaning they're a bit less smooth but it's easier to reach full speed. Because they are European release, they may be (but might not be) multi-language. Thank you for bearing with me this far and I hope this guide was of at least some use to you. Feel free to direct and questions or problems at me in the comments, I'll try my best to answer them and help. In case of troubleshooting, please try to include screenshots and as much detail as possible. Thank you.
Archived post · Original source retained.
View original on FunnyJunk ↗
Originally posted Nov 26, 2016.
7 images unavailable in this archive.
Video files were not included in this archive.
View original on FunnyJunk ↗
Originally posted Nov 26, 2016.
7 images unavailable in this archive.
Video files were not included in this archive.
Archive details
- Historical content recovered from Arquivo.pt; the archive capture date is not the original publication date.
- Comments and original vote counts were not included in this export.
- Category is a local classification unless it matches an explicit source channel.
- 7 original image reference(s) were unavailable; available images retain their original order.
- Referenced videos were not downloaded and are not playable in this archive.
The conversation 0
Oldest firstGot something to add?
Log in to reply ↗No replies yet. Be the first to start the conversation.